![[PukiWiki]](./skin/BAKIN_logo_92.png "[PukiWiki]")
First-person games can also be created.
Not supported at this time.
You can import assets such as 3D/2D/sound/movies for use in game creation.
Please see Specifications of Various Assets for the standards for each asset.
Paid and free DLC are available on Steam.
For a list of DLCs, please click below.
Clicking the "Add" button on each category in the resource menu opens the asset picker, from which you can import assets.
For 2D/3D assets, you may want to import "stamps".
See 3D Stamps - Import and Export for more information.
Backup file settings can be made in the Top Menu > Configuration.
To resume editing from a saved backup file, go to the Top Menu "History" or "Local PC", select the project you wish to edit, and then select "Continue from Backup".
First, please make sure that the rights to the font you wish to use have been cleared for distribution.
First, specify "Use the Standard Font" in the Top Menu > Configuration > In-Game Font Style.
Next, place the font file "font.ttf" you wish to use directly under the folder of the project to be exported, and export your work.
Dash can be prohibited by using the "Event Panel Enable/Disable Player to Run".
It is not possible at this time to change the operating method during the game, such as operating for a side-scrolling game on one map and a top-down perspective game on another map. (It is possible to change the camera's viewpoint for each stage or scene.)
It depends on the complexity of the collision, but if the level of detail is similar, there is almost no difference in performance between terrain and objects.
Also, if a backup file (or folder) has been automatically deleted, is there a way to restore it?
The storage period is 30 days.
The backup data is stored in the “backup” folder within the project's save folder, so you can save it to a different location using File Explorer.
Please move the saved data back to the “backup” folder and resume your work by selecting “Continue from Backup.”
However, please note that when you open a project and begin working, any backup data older than 31 days will be deleted when a new backup is created.
If backup data is deleted, there is no way to restore it.
The key configuration has separate bindings for Menu controls and Walk controls.
Talking to or examining events uses the Walk - Decide key.
Please change the Walk - Decide binding instead.
Press F4 or Alt+Enter to toggle between fullscreen and windowed mode.
The black bars are displayed to maintain the game's 16:9 aspect ratio.
This is the intended behavior.
You can create plugins using C#.
However, during the Early Access period, the areas that can be modified by plugins are limited.
Please see What are Plugins? for more information about currently modifiable areas and how to create plugins.
This dialog will appear if you have applied the Battle Plugin to your project.
Please try the followings:
Yes.
You can use separate .cs files through the custom meta syntax @@include.
Please refer to the documentation below for details.
https://rpgbakin.com/pukiwiki_en/?What+are+Plugins%3F#fbdaae55
Right-click on the event placed on the map editor and make sure "Falling by Gravity" is turned off.
"Falling by Gravity" can also be toggled on and off in the properties of each object in the "Placed List" palette.
Specify the property "Type" as "SE" for the imported sound data in Resources > Sounds.
If "Play as 3D sound" in the "Play Sound Effect" event panel is checked, the volume will change depending on the distance between the event and the player. Uncheck the box if you do not need volume attenuation with distance, such as for system sound use.
The collision range can be specified from "Custom Collision Range" in the event sheet "Change Elements During Sheet Execution".
Event contents can be exchanged through external files using "Export" and "Import" in the upper right corner of the event editor.
However, resources specified in the event must be exchanged separately.
(e.g., the image data specified in the command script "Display Image" must be given to the other party separately from the event).
If a condition is specified for an event to execute, the event will not appear on the map until that condition is met.
For example, let's say you want to create a "villager who joins the party when the player has a certain item" event.
If you want to keep the villager visible regardless of whether or not the player has an item, you need to create an "unconditional" event sheet in addition to the event sheet that has "has an item" as the execution condition.
If there are multiple event sheets, it will check the sheets at the top and bottom of the list to see if the conditions are met.
Please note that if the sheet on which the condition is met is not a parallel event sheet, the event will be terminated by executing the contents of that sheet.
In the Database > Casts > Others tab, you can specify "Events Disappearing Conditions" to determine when the cast will disappear after being fired.
If you create an input screen with only numbers displayed in the "String Input" event panel and then have the user input the data, you can treat the variable that receives the input as a "value". However, if a variable has a content other than "value", the variable is treated as "0" if it is treated as a "value".
From the Input Support button in the event panel displaying the conversation or message, select \H[Name on Database] and insert it, then replace the [Name on Database] part with [(name of that cast registered in the Database)].
If you do not insert a frame elapse, the system is designed to continue processing without becoming idle as long as possible, so insert a 0-second "wait" panel at the appropriate timing when you want the frame elapse. (It does not freeze because it contains a timeout specification when a maximum of one second has elapsed.)
If you are not sure when to put it in, we recommend just before the "End Loop".
This can be solved by going to Resources > Images or Resources > Textures and specifying "Clamp" for the Uwarp/Vwrap/Wwrap property of the image that is causing the problem.
Not possible at this time.
The following methods are available:
One method is to create a “Before the Bridge is Built” event sheet for the bridge event and treat the area as an invisible wall.
Before the bridge is built, use the “Custom Collide Range” setting in the event sheet to define collision, and leave the graphic unset. This creates an invisible wall that prevents passage until the bridge appears.
If I assign attributes through class, it results in dual attributes and their resistances get combined.
One method is to set the cast member’s attribute to “None” and change their class to control their attribute.
Another possible approach is to use equipment items:
- Go to Database > Casts > Equipment and Abilities, and increase the number of equipment slots in the Initial Equipment section.
- Do not display that slot in the layout (treat it like hidden equipment).
- Apply the attribute through the item’s abilities.
Yes. Use the “Add/Remove Party Member” panel to temporarily add the cast member to the party and then immediately remove them.
This will register the cast member in the picture book.
https://rpgbakin.com/pukiwiki_en/?Party#je319574
Yes, you can do this by using the “Advanced String Variable Operations” panel.
Yes. In the “Advanced Variable Box Operation” panel, use “Coordinate Information for Player.”
For the second track (BGM②), use the “Play Fanfare” panel.
As of Version 2.4, only one input method can be used at a time.
You can use either keyboard input or D-pad/gamepad input, but not both simultaneously.
Yes, you can.
Go to Game Definition > System Resources > Screen Transition Effects and assign animation data created with the Sprite Tool to "Conversation Cast Display Effect".
You can refer to the default sprite set "DialogueAnimation" as an example.
Additionally, you can override the animation specified in the Game Definition by using the "Change Screen Switching Effect" panel in the Screen Effects category of the event.
You can create a dedicated camera for conversation portraits using the Camera Tool.
Rendering settings can also be configured for the camera, allowing lighting adjustments as well. See the section about conversation scene cameras in Camera Tool.
You can change it from:
Game Definition > System Resources > Conversation Cast Display Effect
You can also change it during events using the Change Screen Transition Effect panel.
Enter a negative value.
You can adjust the event’s scale in the Map Editor.
You can also change it using the “Change Event Scale” panel.
To change the base size of the decal itself, go to Resources > Decal Stamps.
Subgraphic motions are synchronized with the main graphic’s motion.
For example:
If the main motion is wait, the subgraphic uses wait.
If the main motion is walk, the subgraphic uses walk.
In Database > State Definition > State Abilities, there are abilities that can lock or disable equipment changes.
Create a State with the desired ability, then apply that State through an event.
In the “Select from Selection and Check Results” panel, you can reduce the number of choices to one.
By default, the panel contains two choices: “Yes” and “No”. Simply delete one of them.
1.Total Status of the nth in the Party
2.nth Status in the Party
No.
Movement depends on gravity, the implicit mass assigned to the object, and air resistance.
Because of this, the Move Player with Physics Engine panel is not suitable when precise movement distances or heights are required.
Instead, use panels such as:
Yes.
Refer to the Dungeon RPG Sample project available in the Game Gallery.
The following are particularly useful references:
Be sure to enable Enhanceable on the Basic tab of each item.
The Dungeon_B1 map in the sample project also contains an Item Enhancement event that demonstrates how to enhance items through events.
The manual also contains relevant information.
https://rpgbakin.com/pukiwiki_en/?Creation+Tips#b5280f70
The RigidBody used for the collision is intended for decorative parts (such as accessories) that sway using physics constraints.
If you want the event itself to move using physics, enable Move When Push in the event settings.
When Move When Push is enabled:
For an example setup, refer to the Pushable Event event template.
Yes.
You can obtain this information using the Obtain Battle Information panel.
Use the Add/Remove Party Member panel.
Since the party cannot become empty, first add the new cast member to the party, then remove the original player cast.
When standing on top of an object, friction prevents the player cast from moving. This is the same mechanism used to prevent sliding.
They can move if an upward force is also being applied.
On slopes, they can move in the downhill direction.
These behaviors are the current intended specifications.
See Formula for Calculating Level Increase by Experience on the Casts page for the formula for calculating the increase in status when leveling up and the amount of experience it takes to level up.
This can be changed by giving them a weapon item and editing the damage calculation formula for that weapon.
This can be done by using a system of classes and subclasses.
Currently, one attribute can be specified as a cast-specific ability, but multiple attributes can be added to a cast by specifying a class and/or subclass that has an attribute.
Whether an attack hits or not is determined by taking into account the evasion rate of the attack target and changes in accuracy and evasion rate due to weapons and conditions. During test play, compare the attacker's accuracy with the opponent's evasion rate Total in the Cast Parameter Check View that opens with the F6 key.
For state properties that affect the battle result, turn off the Removal Condition "When Battle Ends". If you want to remove the state after the battle, you can specify the Removal Condition "Time (Seconds on Map)" to 1 (remove the state after 1 second has passed on the map after the battle), or create a common event that works in parallel with the event to remove the state.
It’s recommended to assign a Call Common Event to the skill and directly increase the status within that Common Event. This way, the status won’t decay each turn.
There is no hard limit on the number of entries in the database.
However, depending on your working environment, having a large amount of data may slow down the database screen.
It’s recommended to first register sample entries and duplicate them to test performance with large datasets.
Yes, you can indirectly reflect a Luck status in various mechanics by using the following method:
In Database > Items, set the item’s price to 0.
Yes, this is possible.
Refer to the item abilities section in the manual and configure the necessary abilities for the weapon.
https://rpgbakin.com/pukiwiki_en/?Items#s52b19d5
First, create the event as a common event.
Then, in Database > Items, select the target item and assign the common event in Item Abilities under "Common Event to be Called".
Yes.
In Database > Items, set the item’s "Price" to 0 to make it unsellable.
You can add more by going to Resources > Terrains and loading the textures, etc. to be used for the terrains.
See Assets - Terrains for more information.
Footsteps can be specified in Resources > Terrain Properties "Sound Effects".
Import the sound effect you want to use for the footstep sound into Resources > Sounds and specify the property "Type" as "SE" in advance.
The interval between footstep sounds is a point for future improvement.
It is the "stamp" that can be placed in Bakin and placed on the map.
If you are importing graphic assets from the DLC, usually add them from the "3D/2D Stamps" section.
Non-stamped resources can be made into stamps by using the "Generate Rendering Stamp" above the file tree for each resource, which will then appear in the Map Editor's Stamps palette.
Stamps that are not in any folder in the file tree are in the "Uncategorized Folder" in the Stamps palette.
In Resources > Particle Properties, specify the appropriate value in the Effect Play Time section to ensure that the effect will play to the end.
Yes, it is possible.
Select multiple resources you wish to change, and rewrite the options in the properties to apply the changes to all selected stamps.
In Resources > Materials Properties, specify Double Sided for the Culling section so that the polygons will be rendered on both sides.
There is no certain way to do this, as it depends on your environment.
However, the process can be reduced by removing collisions on objects that the player will never come into contact with, or by replacing collisions with simple collisions such as boxes. (In simple collisions, mesh processing is heavier because of the finer collision detection.)
Please check the Resources for the stamps you are using and change the specifications as necessary.
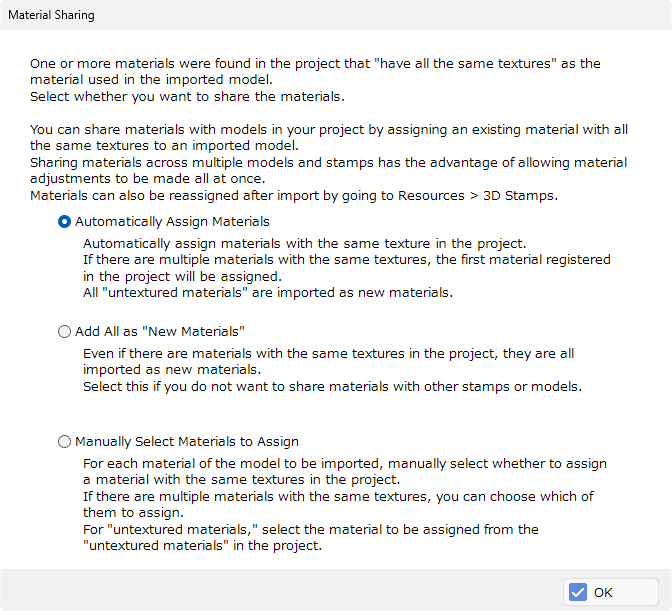
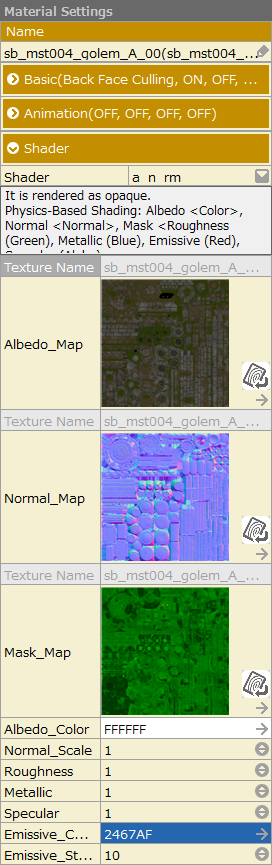
If there are materials in the project that have "all the same textures" as the fbx materials to be imported, the "Material Sharing" dialog box will open.
This dialog allows you to choose whether to share the materials or not.
Materials can be reassigned in Resources > 3D Stamps even after importing.
You can share materials with models in your project by assigning existing materials with all the same textures to imported models.
[Advantages/Disadvantages of Sharing]
The size of images that can be used depends on the GPU of the PC used, but we recommend no larger than 8192px per side.
If you have a high-performance GPU, you can of course handle images larger than this.
However, please consider the size used, as the environment of the person playing the exported work will also require equivalent performance.
Note that the size of the "original image of the slice animation" is subject to the same limitation.
If the sampling frequency of the sound file is set to 48 kHz (48000 Hz) prior to import, the sound quality will be preserved.
Semi-transparent is not applied to 2D stamps (billboards).
This setting defines how many seconds the system waits before determining that the effect presentation is complete during battle. It does not directly control the actual playback duration of the effect.
Environmental sounds are treated as a type of SE (sound effect), so they cannot be adjusted individually in the config menu.
If you want to change their volume, go to Resources > Sounds, select the relevant sound, and adjust its volume in the properties.
Go to Resources > Images and turn off the “SRGB” setting in the image’s properties.
It is recommended to use the SRGB setting as follows:
- Turn "SRGB" ON for objects displayed on maps
- Turn "SRGB" OFF for images not placed on maps, such as cast member portraits in conversations
At this time, Bakin does not support the playback of GIF files.
You can import them as resources, but they will be treated as still images.
The font used is M+.
This font can be used freely without any special licensing requirements.
This is not supported in the current specifications.
Please see 3D Characters.
The icon position depends on the collision height of the cast character’s graphic.
Adjust the collision size in Resources > 3D Stamps or 2D Stamps.
In Resources > Textures properties, check whether "SRGB" is enabled.
For textures used on map objects, enabling SRGB is generally recommended. You can also adjust the texture colors directly in the image file itself if necessary.
Adjust the Cutoff Threshold in the shader properties under:
Resources > Materials
You can change the scale in Resources > Particles.
Sound effects assigned to particles are treated as 3D sounds.
Because of this, the volume changes depending on the distance between the particle and the player cast:
Far away = quieter
Close up = louder
For 3D sound settings, see Resources > Sounds > Sound Settings.
Go to Resources > Textures and set the MagFilter property to Nearest.
You can either adjust the slice animation images or modify the 2D Stamp collision settings.
If there is too much empty space below the character's feet in the sprite images, reduce that space.
Open your project and navigate to:
Resources > Images > reserved folder > 2D Casts > Hero Casts > Default Cast > For Actions
Compare the images and adjust the distance between the feet and the bottom edge of each frame.
Open your project and navigate to:
Resources > 2D Stamps > reserved folder > 2D Casts > Hero Casts > Default Cast
Adjust the Simple Collision settings in the properties until the character's position appears correct.
Screens with no checkboxes in the layout are screens that are called from other screens.
The checkboxes can be used in the game by specifying them in the "Layout to be Opened" property of the "Submenu Containers" for the layout that has the checkboxes.
Screens that do not have a check box to the left of each layout in the Layout to be Assigned column of the Layout Tool are screens that are called from other screens. The newly created layout must be specified in the "Layout to be Opened" property of the Submenu Containers placed on the screen from which it will be called.
The thumbnail will be thumbnail.png located directly under the project folder.
You can also make a thumbnail of the title screen, etc. by right-clicking in the layout tool preview and selecting the "Capture and Save as Thumbnail".
Yes, it is possible. All resources contained in layouts can be exported to a single file, which can then be imported from the Layout Tool.
See Layout Tool for more information.
In the properties of the text panel within the layout on each screen of the Layout Tool, please turn on the “Outline” switch.
Open the layout tool for the sample game Orb Stories, and refer to the slider panel showing the EXP gained (which advances to the next level when full) in the Battle Results screen layout.
The special format \partyexp[] is specified in the “Parameters Reflected in the Slider” property of the slider panel.
Yes. In the Layout Tool, go to the submenu container under the menu container.
In its “Action” property, assign one of the following actions and specify the Common Event to run:
- “Call Common Event”
- “Close and Call Common Event” (this closes the menu before running the event)
Please refer to the “Member_Dungeon_Change” layout used in the Replace Member screen of the “Dungeon RPG Sample” project in the Game Gallery.
While a bit unconventional, you can use the item selection screen as a workaround:
Yes. Assign a common event to each menu entry, and trigger “Generate Events” from within that common event.
Since common events internally have coordinates, you can:
1. Use “Teleport Event” to move it to a desired position.
2. Generate a new event using “This Event” as the source.
This allows you to spawn events at any location.
Yes. In the Layout Tool, add a text panel as a layout part to the cast picture book screen.
Then, set the property “Specify What to Display in the Panel” to the special format:
`\currentdictionarydesc[]`
This will display the description entered in Database > Casts.
This is the intended behavior.
As a workaround, please try one of the following methods:
Please set #known in the layout property "Management Tags for xx to be Displayed".
This will ensure that only discovered entries are listed.
If nothing is specified, it is intended behavior that undiscovered skills will appear as "???" or as the text defined in Game Definition > Common Terms > Undiscovered xx.
Please make sure the parameter used in the special format (for example, inside \partystatus[]) includes a number prefixed with "g".
Go to:
Game Definition > Rules & Rendering > Battle Related
Then turn off "Show 'Escape' Command".
See also: Production Tips > Party Menu
Yes.
The Item Description field in Database > Items supports variables.
When an item is obtained, assign or append the appropriate string corresponding to the status boost to the variable as needed.
Yes.
Open Layout Tool > Conversation Screen, then select the layout you want to use in Layout to be Assigned.
In the layout properties on the right, enable Reflect the Rendering Order of the Cast Displayed.
Normally, layout parts lower in the Layout Parts list are rendered in front of those above them.
However, conversation portraits shown in dialogue or message layouts are always rendered behind the conversation window by design.
Conversation portraits are displayed using the following special text commands:
\dialoguecharacterright
\dialoguecharacterleft
You can specify whether to turn the display on or off at the following locations.
The Quick Toolbar also has a function to fix the display position.
You can turn off the display by going to the "View" menu > "View Project Paths" at the top of the Map Editor.
Not possible at this time. We are currently considering how to handle this issue.
Yes, it is possible. With a few exceptions, the resources contained in maps are also copied.
See Multiple Launch of Bakin for more information.
Yes.
Right-click the terrain and select "Export Model" from the context menu. The terrain will be saved as an FBX file and can also be placed on a map as a 3D stamp.
See also: Map Settings Palette > Context Menu
Yes.
As shown in the video linked below, you can cut terrain using Ctrl+X to create maps with non-rectangular shapes.
https://www.youtube.com/shorts/3EHLWijJnOM
However, if you want a perfectly circular or triangular map, you will need to create a custom model.
You can specify the assignment of actions to keys and buttons at Game Definition > Move and Operate > Assign Input Device.
See Assign Input Device for more information.
Not possible at this time.
Yes, you can change it.
The default color can be set in Game Definition > [[Rules & Rendering]] under "Display Color for Hidden Areas".
If you specify "000000" as the color, the silhouette will no longer be displayed.
You can also toggle the silhouette on/off during events by using the "Make Display Color for Hidden Areas Invisible/Visible" panel in the Player category of events.
You can change it from:
Game Definition > System Resources > Screen Transition Effects
You can also change it by an event using the Change Screen Switching Effect panel.
No additional manual conversion work is required.
When "Use Internal Format" is enabled, resource conversion to the internal format is performed automatically.
Go to Game Definition > Move& Operate > Assign Input Device > Mouse. There, you can choose whether mouse button input is triggered on On Press or On Release.
Go to Resources > Images or Resources > Textures, select the affected resource, and disable the Texture Compression property.
When Texture Compression is disabled for an image or texture, texture size may increase because mipmaps are generated, resulting in a larger project size.
However, the faster loading provided by Use Internal Format is still applied.
The success rate of "escape" on the player's side is determined by the following formula.
If the "escape" attempt fails, the success rate increases by 15% for each failed attempt.
(1.5 - Highest Agility of the Enemy Party / Highest Agility of the Party (Player)) * 100
Highest Agility of the Enemy Party: The agility value of the fastest monster in the enemy party
Highest Agility of the Party (Player): The agility value of the fastest cast member in the party (player)
If the monster chooses to "escape," the decision is not made and 100% of the time it succeeds.
Please add a State Disabling ability for the created "State" to the "Instant Death" state's abilities.
This is likely because, in the battle layout (which determines the positioning of both allies and enemies during battle), the distance between them is too great, causing some enemies to fall outside the effective range of your weapons.
Whether an attack can reach a target depends on the relative positions of both allies and enemies and the range of the weapon being used.
(For example, front-row enemies may be within range, while back-row enemies are not. Longer-range weapons may be able to reach farther targets…)
Also, the battle layout needs to be configured based on the number of enemies.
In this case, please refer to the layout settings and adjust them to accommodate battles with 4 to 8 enemies.
Introduce the Concept of "Front Row/Back Row" to the Party in Battle
Use Attack Range
Enemy Distribution
Yes, you can control the camera through events using the “Change Camera Parameters” panel.
By using a Battle Event, you can get the target’s coordinates. Then, based on those coordinates, use the “Change Camera Parameters” panel to move the camera offset toward the target or adjust the angle accordingly.
Use a Battle Event.
Set the event trigger to “In Battle, Repeat in Parallel,” and use the “Obtain Battle Information” panel to store the cast member’s HP or state condition in a variable.
If the HP reaches 0 or the specified state (in this case, KO) is applied, execute the event.
As of Ver. 2.4, it is not possible to close the battle command screen via events.
Yes. Use a Battle Event to detect whether a party member is dead (for example, HP is 0) at the end of each turn.
Then, use the “Add/Remove Party Member” panel to remove that member from the party.
Please refer to the ESP gauge shown in the battle result screen of the sample game "Orb Stories" (the gauge fills up toward the next level).
In the slider panel, set the “Parameters Reflected in the Slider” property to the special format: \partyexp[].
In Database > State Definition:
For the "Instant Death" state, add "State Disabling" for all other 'states' (excluding "Instant Death") in its state abilities.
In other words, if you configure it so that all other states are removed when a cast becomes KO, their state icons will disappear.
Yes. Use the “Obtain Battle Information” panel to get the index of the currently acting cast member.
Then, use the “Make Battle Cast as Operation Target” panel to set that cast member as the target.
This allows you to apply “Change Event Motion” and “Show Effect” to the acting cast member.
https://rpgbakin.com/pukiwiki_en/?Battles
Unless you force an action order using Battle Events, the order is determined by the final speed value.
This value is calculated from multiple factors such as the cast member's status, equipment, items, and skills.
If you want a specific cast member to always act first, you can adjust their speed using events.
For example, switching between armored and unarmored versions based on HP.
Yes. In a Battle Event, first use the “Make Battle Cast as Operation Target” panel to select the enemy.
Then, use an event command to change the graphic based on conditions such as HP.
Yes. First, use the “Make Battle Cast as Operation Target” panel to select the target cast member.
Then, in the “Advanced Variable Box Operation” panel, use “Coordinate Information for This Event” to retrieve the position.
You can configure this under the following settings:
Using the Sprite Tool, you can create an effect with no image assigned and only a sound effect attached.
Yes.
You can configure this in:
Database > Casts > Battle Tab > Battle Action AI
Use the turn number conditions to create that behavior.
Yes.
Using a battle event with the "At the End of Action" trigger, you can check whether the item is equipped and restore HP if it is.
Possible ways to check equipped items include:
Use the "Advanced String Variable Operation" panel to store the equipped item’s name in a variable, then determine whether it is equipped by checking the name.
Create a unique "State" for the item in Database > State Definition.
Then, in Database > Items > Item Abilities, use "Ability When Equipped: State" to apply that state when the item is equipped.
If the cast member has that state, it means the item is equipped.
Yes. You can change this by using a State.
Go to Database > State Definition > State Abilities > Battles > “Change in Targetability”.
You can check each cast member’s target rate in the Cast Parameter Check View, which appears when you press F6 during test play.
You can configure them in:
Game Definition > System Graphics > Battles > “Numbers for Damages”
Register images for the numbers 0–9 in Resources > Images.
(For image property settings, refer to the existing damage number images.)
At the moment, the animation used when damage numbers appear can only be changed by directly modifying the battle plugin.
The same formula used for normal attacks in battle is applied.
If the cast member has a weapon equipped, the weapon’s damage formula from Items is used.
If no weapon is equipped, the cast member’s “Bare Handed Damage Formula” from Casts is used.
The final drop rate is calculated as follows:
(Base Item Drop Rate * (100 + Total Item Drop Rate Bonuses from States) / 100)%
For example, if the total item drop rate bonus from States is 100, each item’s drop rate becomes double the normal rate.
In a battle event, at the start of the battle, use the Make Battle Cast as Operation Target panel to select the player character as the operation target. Then use the Make Event Invisible panel to make the selected character invisible.
If you use this method, remember to make the player character visible again when the battle ends.
If you are using the Dungeon RPG Sample as a reference, another option is to configure the Battle Layout so that the player character is placed behind the battle background image on the battle map.
There are several possible causes.
https://rpgbakin.com/pukiwiki_en/?State+Definition
If the cast has a class assigned, the class may also have a Poison Damage Reduction value configured.
Yes.
The Battle Plug-in Sample project already includes an implementation of this effect.
See the following:
The Slow skill delays the target's turn by applying the Agility Down state.
If you want the effect to last for only one turn, configure the state's removal condition to expire after one turn.
'edef'' contains the elemental resistance multiplier used in damage calculations.
Specifically:
edef = (100 - ResistanceValue) / 100
Examples:
Create the conversation as a Battle Event.
First, refer to the online manual below and create a simple battle event in the Common Event palette that only displays a message. Then change its Event Start (Event Trigger) setting to see how different triggers work.
Related Online Manual: https://rpgbakin.com/pukiwiki_en/?Event+Editor+Features#nf08c6f3
For battle-related event panels, see the manual below.
To manipulate a cast member during battle, you must first use the Make Battle Cast as Operation Target panel to designate that cast as the event target.
As a simple test, use Make Battle Cast as Operation Target to select a party member (for example, the first member), then create a battle event that reduces their HP using the Change Cast Status panel.
Related Online Manual: https://rpgbakin.com/pukiwiki_en/?Battles
During test play, open the debug window using the F5 key and check that free fall is not turned off in the system status tab.
Falling by Gravity can be toggled on and off from the context menu by right-clicking on the "Start Point" specified. (You can also switch from the Quick Toolbar).
The "height of steps that can be climbed" and "jumping off from elevation" can be set in the Game Definition > Move and Operate Settings.
It is possible.
The camera operation can be switched on the configuration screen.
Try adjusting the text size in your Windows display settings.
Place an image named "thumbnail.png" (size: 256×144) in the project’s folder. It will be used as the thumbnail in the History list.
You can also save a thumbnail by right-clicking in the Layout Tool preview.
Additionally, by using the camera button at the top of the layout preview, you can capture a scene from a specified map and use it as your thumbnail.
Yes, that is not a problem. It will also work correctly in exported builds.
Windows uses only the following icon sizes: 16, 32, 48, and 256, and only these sizes are saved.
If you set the Explorer view to “Extra Large Icons,” you can check the 256×256 version.
Note: Windows caches icon data, so even if you export a new .exe with a different icon, it may not update until you restart Windows.
As a workaround, you can temporarily rename the .exe file to see the new icon immediately without restarting.
Currently, Bakin can only be installed via Steam.
Asset DLCs (3D models and sounds) for SMILE GAME BUILDER can be used in RPG Developer Bakin, with the exception of the DLC listed below. (Commercial use is also permitted.)
Please be sure to review the End User License Agreement (EULA) before using any DLC.
The exported game requires .NET Framework 4.6.2. However, since it is pre-installed on Windows 8.1 and later, there is no need to explicitly enable it.
Steam Input support is automatically enabled by Steam when the game is published on Steam.
No special setup is required on the Bakin side.
No, VR is not supported.
This bundle is mainly intended for users who already own “SMILE GAME BUILDER” and want an easier transition to “RPG Developer Bakin”.
Assets from “SMILE GAME BUILDER” can also be used in “Bakin”, so you may find the bundle useful if you want additional assets or are interested in older tools.
Some paid DLC characters from “SMILE GAME BUILDER” have also been updated and re-released as DLC for “Bakin”.
1.Create a transparent FBX model, create a stamp that uses this model as its graphic via Resources > 3D Stamp, and place it as a wall.
2.Create terrain with Traversable set to No in Resources > Terrain Properties, and replace the terrain in areas where the player should not be able to enter. (For objects placed on top, turn Overwrite Non-Traversable Terrain off.)
There is no difference in performance between the two methods.
However, if the collision shape is set to Simple Collision, method 1. is generally more robust and less likely to allow collision pass-through.
See System Requirements for details on operating environment.
In addition, a "Sample Game for Operation Check" is available on the official website for you to try.
(Please refer to the notes on the use of this game.)
It is the same as the operating environment of the tool.
It works.
At this time, only the Windows version is available.
If you are using an NVIDIA GPU and experiencing slowdowns when playing RPG Developer Bakin test plays or sample games, please try the following.
https://store.steampowered.com/news/app/1036640/view/3398554764317089976
Yes, it is possible.
The Utilities/Export function can be used to export a project as an exe file.
You can give the exported exe file to another person with a Windows PC to play.
However, the PC of the player must meet the System Requirements.
There are no restrictions on the content of games created using this software.
However, we are not responsible for the content of the created game or any problems that may arise when distributing or selling it.
Please confirm the license agreement for the main unit and DLCs before use.
https://rpgbakin.com/pukiwiki/#reea24f1
Please refer to Article 7 of the End User License Agreement.
As long as you follow this clause, creating adult games is allowed.
Yes, you can.
No royalties will be paid to us for distribution, whether paid or free.
However, we are not responsible for the content of the created game or any problems that may arise when distributing or selling it.
Please confirm the license agreement for the main unit and DLCs before use.
https://rpgbakin.com/pukiwiki/#reea24f1
The content may be sold in accordance with the terms and conditions of the license agreement for each downloadable content.
All can be used.
At this time, only works for the PC can be produced.
However, as with the previous "SMILE GAME BUILDER" tool, we plan to export projects created using this tool to other tools, from which they can be exported to home console software and mobile device applications.
Although the schedule is not yet decided, we plan to provide some form of functionality to export this tool's project as a Unity project, similar to its predecessor, "SMILE GAME BUILDER". We expect you to use that and export to mobile and consumer devices via Unity.
We believe it is possible if you create a patch file using a commercially available binary diff tool. (We will not be able to provide specific tool names or instructions on how to create patches, as this is a product of another company.)
Only XInput controllers are supported at this time.
(On Bakin, DirectInput controllers are also available, thanks to controller support by Steam).
No, it is not supported due to Steam’s policies.
According to Valve, Family Sharing currently applies only to “games,” and not to “software” like this tool.
Yes, you are free to use it.
However, in accordance with Section 7, Paragraph 2 of the Bakin End User License Agreement (EULA), you must include a notice such as “Visuals created using Bakin” along with the appropriate copyright attribution (©) either within the video or in a visible location such as the YouTube description.
Yes, you may arrange the music as long as it is used within a game created using Bakin.
It is also fine if the arranged music is included in gameplay videos of your game.
When publishing videos, please include the notice described in Section 7, Paragraph 2 of the EULA in a place visible to viewers (such as within the video or in the YouTube description).
Please refer to the Bakin EULA for details (available on the Bakin Steam store page).
Yes, it is perfectly fine to publish a project that is still in development on the Steam Workshop.
Several projects have already been published, so feel free to refer to them as examples.
As of version 2.4, the following command-line options are available:
/FS=false
Disables full-screen mode. If “Launch with Full-screen” was selected during export, this option can be used to toggle between full-screen and windowed modes.
/L=**language** (e.g., /L=en)
Forces the specified language to be used at startup.
Currently, no command-line options are implemented for rendering settings.
Copy the entire project folder from the old PC to the new PC.
Then, in Bakin installed on the new PC, open the project from Local PC.
If you also want to migrate your work environment settings (such as hotkeys and palette docking layouts), follow these steps:
1) In the Steam Library, click the gear icon on the right.
2) Select Manage > Browse Local Files.
3) Copy the following files from the opened folder:
settings.dat
mapedit_docking.config
hotkey.dat (if you customized hotkeys)
Then, on the new PC, open the same folder through the Steam Library and paste those files there.
Notes
settings.dat may contain path information from the old PC. Missing paths or files on the new PC will simply be ignored.
Window positions and sizes may be affected if the screen resolution or number of displays differs between the old and new PCs.
Open the Bakin page in your Steam Library, then go to Gear icon > Properties > DLC. Make sure the checkbox for the DLC is enabled. If it is unchecked, enable it.
Also, if you see the green Play button on the left side of the Bakin page in your Steam Library, it indicates that the DLC has already finished downloading.
No.
For Chinese, the engine loads the operating system's default font (for example, Microsoft YaHei for Simplified Chinese) from Windows, so there are no font licensing issues.
In the Published Work Export dialog, enable the Fullscreen checkbox in the lower-right corner before exporting.
If this tool does not launch, see When Problems Occur.
Please make sure that your PC's graphics board drivers are up-to-date.
If the above does not solve the problem, please see When Problems Occur.


